Monday, November 9, 2009

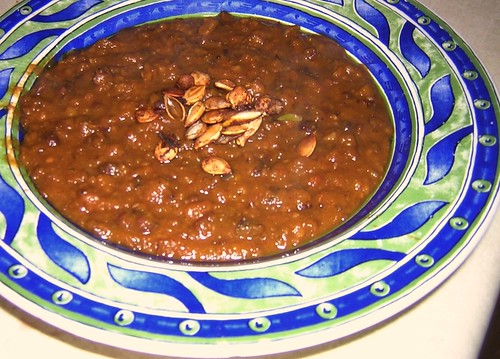
Pumpkin Black Bean Soup

This soup is autumn in a bowl. It's filling, warm, healthy and involves pumpkin. What more could you ask for? Oh it's also embarrassingly easy for such a tasty dish.

I'm not usually excited about cooking that involved pouring things from cans and the spice cupboard, adding heat and eating. But sometimes that's all you have the energy for, and this is the perfect thing to make while in one of those moods and still having a great dinner no one will realize you put nearly no effort into. And those cinnamony roasted pumpkin seeds I made the other day are a amazing on top of this.

The chef and I decided this soup is pretty great but it's probably missing bacon. It needs a little something extra to amp up the flavor and take it from yummy to out of this world. Oh darn guess I'll have to cook it again and experiment with adding bacon next time. Unless someone wants to do that arduous task and let me know what happens.


Pumpkin Black Bean Soup

2 cans black beans (15 oz each), drained and rinsed
1 can (14.5 oz) diced tomatoes
4 cups vegetable broth

4 Tablespoons olive oil
1/2 cup red onion, chopped
2 garlic cloves, minced
1 Tablespoon ground cumin
1 1/2 teaspoon kosher salt
1 teaspoon cinnamon
1 teaspoon allspice
1/2 teaspoon ground black pepper
1 teaspoon cayenne pepper

1 can (16 oz) pumpkin puree
3 Tablespoons balsamic vinegar
Baked pumpkin seeds, for garnish

In a food processor puree the beans and tomatoes with half of the vegetable broth.

Warm oil in a large pot then sauté red onion, garlic, cumin, salt, cinnamon, allspice, pepper and cayenne on medium heat until onion and garlic are brown; about 3 minutes.

Add pureed ingredients, pumpkin and the rest of the broth to the pot. Simmer uncovered until thick, stirring often and scraping the bottom, about 40-45 minutes.

Before serving stir in balsamic vinegar. Garnish with baked pumpkin seeds.

Original recipe from Noble Pig blog.

Sunday, November 8, 2009

Mattar (Green Pea) Paneer

A couple of weekends ago the fella and I went to visit some friends in Milwaukee to catch up, meet their newest bull mastiff and go bulk food shopping. As a result much fun was had and we came home with a gallon of marinated artichoke hearts, a barrel of kalamata olives and 5 pounds of paneer to list only a few items of bulk insanity. Artichokes and olives have therefor been making a lot of appearances in our cooking as of late. Being the curry freaks we are I figured that paneer would be gone in no time. Turns out finding interesting dishes other than saag paneer is more difficult than one would think. Fortunately we are resourceful and the Internet is on our side.

When I put the fella in charge of finding something delicious to make involving paneer he stumbled upon the rather interesting site of Indian Food Forever. Any Indian dish you've ever wanted to make is there and easy to find but the recipes are like a scavengers hunt of randomness. The ingredient lists are not in any logical order and the instructions call for the already mangled ingredient list willy nilly. So it's a good Indian cooking research with recipes that need to be translated into something usable before cooking, you've been warned.

At first green pea and paneer curry sounded a little dubious. But as the chef and I sat on the couch writing and let the fella do the cooking we started to smell the awesome that was emanating from the kitchen. It was about then I stopped doubting dinner would be delicious and started wishing dinner was ready.

It was a nice change to eat something this fabulous without having to be involved in it's creation, the chef and I both agreed. The fella had a huge dinner success and got to carry around the smug look of someone who made the two resident foodies coo over a perfectly spicy Indian dinner. Though we have now officially started to play with the somewhat scary precedent of trying to one up one another in making spicy food. I made a kidney bean curry with three jalapenos, the fella paneer with 4 serranos and I can only imagine what the chef will do with 5 chilies when it's his turn to cook. I'm sure it will be wonderful if dangerously spicy


Mattar Paneer

2 medium onions, chopped (divided use)
6 cloves garlic, chopped
1 tablespoon ground coriander

1/2 cup ghee or coconut oil
1 pound Paneer

1 tablespoon ginger, grated
4 bay leaves

1 tablespoon turmeric powder

1pound shelled green peas
3 green chilies, chopped
4 medium tomatoes, peeled and sliced
1cup plain yogurt

1 cups water


In the food processor make a paste out of one of the onions, the garlic and the coriander.

Heat the ghee or coconut oil in a large frying pan over medium heat. Cut the paneer into 2 inch cubes. Fry the paneer to light brown then remove to a plate.

Add the remaining onion, ginger and bay leaves to the oil in the pan and fry until the onion is golden brown. Then add the turmeric and the onion paste mixture and fry about another 5 minutes.

Add the paneer, peas, yogurt, chili, tomato and salt to taste. Stir for 5-6 minutes over low heat until well combined.

Pour in the water and simmer gently for 20 minutes or until the sauce thickens a bit. Serve the matar paneer sprinkled with garam masala and coriander if you like.

Original recipe from IndianFoodForever.

Absinthe Ice Cream

I've been waiting for an excuse to make this ice cream for a while now. Every great cake needs a complimentary and equally exciting ice cream at it's side so the fella's birthday was the perfect time to try it out. Especially since I happened to have a dozen egg yolks left over from making the angel food cake which was the exact number of yolks needed to double the ice cream recipe I had my eye on.

No matter how fussy they sometimes might be David Lebovitz's recipes are always spot, I go to his ice cream recipes in The Perfect Scoop again and again because they all work and turn out great even. The bonus is all the ones I've tried so far tolerate substituting in agave nectar for sugar without changing up the recipe portions. So all the hard work of ice baths, tempering eggs, and perfectly heated cream was worth it. Okay the hardest part of the whole experience of cooking for the fella's birthday was to not start drinking the absinthe without him at 3 in the afternoon. The Libertine absinthe at Vom Fass (I'll talk about this addictive store more later) is excellent and worked perfectly in the custard base.

This made the tastiest ice cream ever. Even people who aren't all that into the licoricey absinthe flavor loved the ice cream. It was a huge success if the loud chorus of yummy noises and calls for second helpings were any indication when I served the cake and ice cream. And now I have an excuse to nibble on absinthe flavored ice cream periodically whenever I need a bite of something sweet.


Absinthe Ice Cream

1 cup whole milk
A pinch of salt
2/3 cup sugar

2 cups heavy cream

5 large egg yolks

3 tablespoons absinthe
1 1/2 cups chopped chocolate truffles or chocolate chips


Heat the milk, salt, and sugar in a medium saucepan over medium low heat.

Set up an ice bath by placing a 2-quart bowl in a larger bowl partially filled with ice and water. Pour the cream into the smaller bowl set a strainer over the top for straining the egg mixture later.

In a small separate bowl, whisk together the egg yolks. Gradually pour some of the milk into the yolks, whisking constantly as you pour. Scrape the warmed yolks and milk back into the saucepan. Cook over low heat, stirring constantly and scraping the bottom with a heat-resistant spatula, until the custard thickens enough to coat the spatula.

Strain the custard into the cream. Stir in the bowl over the ice bath until cool, then refrigerate to chill thoroughly. Preferably overnight. Stir in 3 tablespoons of absinthe. Taste, and add another one if desired.

Freeze the custard in your ice cream maker according to the manufacturer's instructions. During the last couple minutes of churning and in the chopped chocolate bits.

Original recipe from David Lebovitz's blog.

Saturday, November 7, 2009

Rice Flour Angel Food Cake


The fella has only one requirement for his birthday: there must be an angel food cake with blue frosting. I love him more than air but in case you've never tried angel food cake making is a pain in the behind. There is also the fact that boxed cake mixes are my Achilles heel of baking. I can make a three layer hummingbird cake with cream cheese frosting from scratch without breaking a sweat but show me a boxed cake and I can almost guarantee it will not turn out.

The first two years the fella and I were together I made the mistake of thinking a boxed angel food cake would be the way to go because even though baked goods in boxes are my nemesis it had to be simpler than doing it from scratch. Right? Both times I spent an afternoon in the kitchen glaring at the box and swearing at the electric mixer. No matter how much I beat the mix it wouldn't fluff up. Convenience food? Ha. After much pacing of the kitchen and many choice words I did end up with a mostly in tact cake placed on the table and frosted and me with a smile on my face, trying not to let on to the fella the amount of crazy I had just re-harnessed behind my beaming faux house wife facade before he got home.

There were a couple moments while making those cakes when all the angel food cakes I would make for the rest of my life flashed before my eyes and I wanted to give up. Was a deep meaningful relationship with a man I love dearly and connect with on almost every level worth making angel food every year? It turns out it is but I still dislike angel food.

This year a box mix wasn't even an option. If I was making this cake I was making a gluten free cake I could eat and if I was going to go through that much effort I was going to make the best freaking angel food cake ever. This would be the year I made piece with angel food.

It worked. I took the super simple recipe for basic angel food cake in The Joy of Cooking and switched rice flour in for the cake flour and stirred in some chocolate flakes to make it more interesting. It was a long 35 minutes waiting for that cake to finish. There is no window in my oven door and opening to peak in would have ruined anything so for 35 long minutes I was sure that I had just wasted a dozen eggs and my afternoon for nothing. When the timer went off and a perfectly risen fluffy gluten free made from scratch angel food cake came out of the oven I couldn't help but do a little dance and congratulate myself. The fella was thrilled and belly laughed at me for my lack of modesty.

Now there was the issue of blue frosting. I thought of all sorts of creative and crazy ideas for flavors or ways to make it blue without food coloring but in the end I went simple. Homemade whipped cream with blue food coloring heaped on the top of the angel food cake so that it looks like a fluffy blue cloud of yum. As you can see the fella was excited by this prospect and I'm excited that I finally made a yummy birthday cake for him.

Turns out angel food cake isn't that difficult after all. The trick is reading the recipe a million times before starting and making sure absolutely all the tools you'll need for all the steps are within arms reach because once you turn that mixer on for the first time you are not leaving that corner of the kitchen for a good 10 minutes but the result is worth it.

So happy birthday to the fella, hope you've had the best birthday week ever.


Rice Flour Angel Food Cake

1 cup brown rice flour
2/3 cup sugar
1/2 teaspoon salt

1/ 4 cup dark chocolate pieces or chips

12 cold egg whites
1 tablespoon water
1 tablespoon lemon juice
1 teaspoon cream of tartar
1 teaspoon vanilla

2/3 cup sugar

Preheat oven to 350. Have ready an un-greased 10 inch tube pan.

Sift together the flour, sugar and salt three times into a medium bowl.

Pulverize the chocolate chunks in a food processor until finely chopped. Set aside.

In a large bowl beat together on low speed with an electric mixer for 1 minute the egg whites, water, lemon juice, cream of tartar, and lemon. Increase mixer speed to medium and continue beating until the mixture increases in volume about 5 times and resembles a slightly translucent soft foam. This should take around 2 to 3 minutes. The foam will hold soft moist peaks when beaters are lifted.

One tablespoon at a time slowly beat in the remaining 2/3 cup of sugar. Do this process over the course of 2 minutes. When the sugar is added the foam will be a creamy white and hold soft glossy peaks that bend over at the points. Do not beat until stiff.

A 1/4 cup at a time sift a fine layer of the flour mixture evenly over the surface of the batter and fold gently with a rubber spatula just until the flour is nearly incorporated. Repeat 7 more times with the rest of flour mix until no traces of flour are visible. During the last addition of flour mixture add the chocolate pieces.

Pour the batter into the pan and spread to level the top. Bake until a toothpick inserted in the center comes out clean, about 35 minutes. Let cool upside down for at least 2 hours, setting the tube over a bottleneck or resting the pan on 4 glasses.

Original recipe from Irma S. Rombauer, Marion Rombauer Becker and Ethan Becker's The Joy of Cooking.

Thursday, November 5, 2009

Cinnamon Pumpkin Seeds

The end of CSA season meant I've had seemingly one of every kind of squash in existence sitting in my kitchen waiting for me to be inspired to do something with them. Then the chef brought over a couple more squash just to mock me the other day. At that point there was no point in delaying it any longer, I took a knife to every squash in the kitchen and roasted them. This will force me to find something to do with their various roasted flesh as every time I open the fridge there they are tempting me. Tonight I simply warmed the acorn squash in some butter in a frying pan and was very happy with it.

However I'm very much my mother's daughter (no worries, I mean it in a good way mom) and the thought of all those squash seeds going to waste was unthinkable, I had to do something with them. I've never made roasted squash seeds before so it was fun to grab the first spice that came to me out of the spice cupboard. Cinnamon with salt sounded divine and it was. I was very pleasantly surprised with the results and made this same combination twice since then.

Even better than the cinnamony seeds themselves is that they are awesome in a salad. I've been hooked on throwing them in mixed greens and spinach with feta cheese and a vinaigrette of olive oil and fig vinegar. It's tastes way too good to be that simple.


Cinnamon Pumpkin Seeds

pumpkin seeds
olive oil
salt
cinnamon

Reserve however many seeds you get from pumpkins and other random squashes you have around for cooking. Toss the slimy pits from around the seeds. Rinse the seeds then spread them over a baking sheet.

Heat oven to 350. Put just enough oil over the seeds so that they are coated. Sprinkle with salt and cinnamon to suit your taste.

Bake for 20 minutes or until well toasted.