Another day another perfect summer salad. This one is courtesy of the Lisa's Kitchen Blog where there is no shortage of out of this world vegetarian recipes. Whenever I want to cook a really unique curry this is the blog I go to because this is perhaps the only other person as obsessed with Indian cooking as I am. She has some of the coolest recipes and flavor combinations, stuff I'd never think to cook.
Like this salad, I was a little leery of the cooked beans, raw veggies and lots of sun dried tomatoes combo but after I poured on the sun dried tomato dressing I became a believer. The flavors are just what I was looking for an a warm afternoon when I didn't want to turn on the stove for more than 5 minutes. The tomatoes and balsamic vinegar create a nice tangy edge for the beans.
The fella who isn't a huge fan of tomatoes wouldn't stop eating this. He said it was like a less evil version of mayo encased potato salad. And he's right the parmesan cheese (I used a half nutritional yeast half ground almonds substitute for vegan parm) and garlic create a pleasant creaminess that reminded us both of mayo but without the heaviness and the fat. And because there is no mayo involved this would be a killer salad for a picnic.
This is another salad that is going into heavy rotation on my summer menus.
Wednesday, June 30, 2010
Tuesday, June 29, 2010
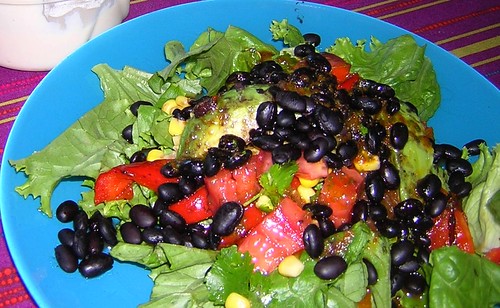
Vegetarian Mexican Salad
This is me trying something new in the hopes of posting more often.
When I cook something unfortunate or something that didn't work for me I'm going to post it and link to the recipe in case you want to give it a try and in the hopes you'll have better luck cooking it than I did. Maybe you will cook it and love it then tell me where I went wrong. I make plenty of mistakes I just don't usually take the time to post about them unless they are particularly epic.
And when I make something fabulous that was amazing but the recipe was perfect I'll just do an easy cheater post and point you in the direction of the talented blogger that created it. This Mexican salad which is a knock off of a dish at Chipotle restaurant is a perfect example. It comes from the Healthy Irishmen Blog where chef Gavan Murphy, and sometimes his wife, post fabulous healthy recipes using fresh organic produce. They have some great recipes to browse through and aside from the potato and bread dishes most of his recipes are French diet friendly.
The recipe for Vegetarian Mexican Salad is especially worth checking out. This is the kind of salad that always looks appealing at restaurants but I never think to try to make at home where I can control the fat and salt content. Now that I know how I will be making this beauty all summer. The super spicy and tangy dressing is my favorite part but if you aren't into breathing fire you'll want to take the amount of peppers down a notch. I also cheated to make this salad even easier by buying some jarred salsa (because the fella won't eat raw tomatoes and I was lazy), mashing an avocado on my lettuce rather than making guacamole, and then sprinkling organic canned corn and some cilantro on the salad rather than making the corn salsa. And if you're on the weight loss phase you'll want to skip the corn all together since it has a high GI but there are so many other tasty things on this salad you won't be missing anything.
When I cook something unfortunate or something that didn't work for me I'm going to post it and link to the recipe in case you want to give it a try and in the hopes you'll have better luck cooking it than I did. Maybe you will cook it and love it then tell me where I went wrong. I make plenty of mistakes I just don't usually take the time to post about them unless they are particularly epic.
And when I make something fabulous that was amazing but the recipe was perfect I'll just do an easy cheater post and point you in the direction of the talented blogger that created it. This Mexican salad which is a knock off of a dish at Chipotle restaurant is a perfect example. It comes from the Healthy Irishmen Blog where chef Gavan Murphy, and sometimes his wife, post fabulous healthy recipes using fresh organic produce. They have some great recipes to browse through and aside from the potato and bread dishes most of his recipes are French diet friendly.
The recipe for Vegetarian Mexican Salad is especially worth checking out. This is the kind of salad that always looks appealing at restaurants but I never think to try to make at home where I can control the fat and salt content. Now that I know how I will be making this beauty all summer. The super spicy and tangy dressing is my favorite part but if you aren't into breathing fire you'll want to take the amount of peppers down a notch. I also cheated to make this salad even easier by buying some jarred salsa (because the fella won't eat raw tomatoes and I was lazy), mashing an avocado on my lettuce rather than making guacamole, and then sprinkling organic canned corn and some cilantro on the salad rather than making the corn salsa. And if you're on the weight loss phase you'll want to skip the corn all together since it has a high GI but there are so many other tasty things on this salad you won't be missing anything.
Friday, June 25, 2010
Pear and Caramel Ice Cream with Rasperry Topping
I've loved ice cream for as long as I can remember. So it was only natural when I started cooking everything myself that I would eventually start making fabulous ice creams as well. My fella was even awesome enough to buy me the best ice cream making book ever, David Lebovitz's The Perfect Scoop, for my birthday last year. I started playing around with making some of the recipes with agave and fructose for the French Diet but never got around to posting about them because I was too busy licking the ice cream maker clean after each experiment.
More recently this same book has been just left sad and lonely sitting on my shelf as I did the elimination diet and found out how truly ill dairy in all forms makes me. My body can try to deny me many things but the only thing I will not give up is ice cream. Even if I have to buy $6 pints of coconut milk ice cream sweetened with agave nectar at Whole Foods I will neglect myself other things to afford that ice cream. So I decided to go back to my favorite ice cream book and start cooking dairy free sugar free versions of some of David Lebovitz's recipes.
I will not give up ice cream and I will not leave my favorite dessert cookbook to get dusty on the shelf. So in between moving and looking for a new job in a new city across the country I'm going to treat myself to homemade dairy free ice cream. This will be the summer that I dare to make dairy free ice cream amazing.
My first experiment was with the Pear Caramel Ice Cream I'd made a couple of times before with heavy cream and really enjoyed. It's a simple recipe so I didn't have to make a lot of substitutions to make it work as a dairy free recipe. The toughest part was playing with caramelizing agave nectar. It is possible but it doesn't quite give the thick, dark, and slightly scorched flavor of caramelized sugar however. But like many things in sugar free or gluten free cooking if you stop thinking about what you're missing and focus on the new flavor you're discovering its still super delicious.
Pushing the pears through a sieve is a pain in the butt, I know but it is worth it for the creamy texture the process gives you. If you don't care then by all means eat the grainy slightly chunky mixture as it is or give it a go round in your food processor to break it up a bit.
This ice cream is even better with some raspberry topping to add a tartness to the almost overpoweringly sweet caramel ice cream. And if you're really feeling out going this all goes great on my Gooey Hazelnut Flour Brownies. These three things together make the ultimate dessert. But worry not the highly decadent ice cream holds up very well on it's own. I end up eating the whole batch before I even have time to turn on the oven.
More recently this same book has been just left sad and lonely sitting on my shelf as I did the elimination diet and found out how truly ill dairy in all forms makes me. My body can try to deny me many things but the only thing I will not give up is ice cream. Even if I have to buy $6 pints of coconut milk ice cream sweetened with agave nectar at Whole Foods I will neglect myself other things to afford that ice cream. So I decided to go back to my favorite ice cream book and start cooking dairy free sugar free versions of some of David Lebovitz's recipes.
I will not give up ice cream and I will not leave my favorite dessert cookbook to get dusty on the shelf. So in between moving and looking for a new job in a new city across the country I'm going to treat myself to homemade dairy free ice cream. This will be the summer that I dare to make dairy free ice cream amazing.
My first experiment was with the Pear Caramel Ice Cream I'd made a couple of times before with heavy cream and really enjoyed. It's a simple recipe so I didn't have to make a lot of substitutions to make it work as a dairy free recipe. The toughest part was playing with caramelizing agave nectar. It is possible but it doesn't quite give the thick, dark, and slightly scorched flavor of caramelized sugar however. But like many things in sugar free or gluten free cooking if you stop thinking about what you're missing and focus on the new flavor you're discovering its still super delicious.
Pushing the pears through a sieve is a pain in the butt, I know but it is worth it for the creamy texture the process gives you. If you don't care then by all means eat the grainy slightly chunky mixture as it is or give it a go round in your food processor to break it up a bit.
This ice cream is even better with some raspberry topping to add a tartness to the almost overpoweringly sweet caramel ice cream. And if you're really feeling out going this all goes great on my Gooey Hazelnut Flour Brownies. These three things together make the ultimate dessert. But worry not the highly decadent ice cream holds up very well on it's own. I end up eating the whole batch before I even have time to turn on the oven.
When your agave nectar starts to look like this you've achieved caramel.
Pear Caramel Ice Cream
3 medium-sized ripe pears, peeled, cored and diced
1/2 scant cup of agave nectar
2 cups full fat coconut milk
1/8 teaspoon salt
a few drops lemon juice
Pour the agave nectar into a heavy saucepan, cooking over medium high heat while watching it very carefully. When it darkens and starts to look like the picture above (this will take awhile, 10 to 15 minutes) begin pushing the liquid around with a heat proof spatula so the middle doesn't burn.
When the agave is a uniformly dark color and syrupy thick stir in the diced pear. The caramel might become hard or make scary hissing noise but don't be afraid keep adding the pears and stirring the mixture for about 10 minutes or until the pears are cooked through.
Remove the pot from the heat and add about 1/2 cup of the coconut milk and stir. Now add in the rest of the coconut milk and a couple drops of lemon juice.
Let this mixture cool to almost room temperature then puree in the food processor until smooth. Press this mixture though a mesh strainer or sieve with your flexible spatula. This will remove the tough fibers of the pear.
Chill this mixture then run it through your ice cream maker.
Recipe adapted to be dairy and sugar free from a David Lebovitz recipe in the Perfect Scoop.
Raspberry Topping
handful of fresh or frozen raspberries
drizzle of agave nectar
water, as needed
Drop the raspberries and a generous drizzle of agave nectar into the food processor and blend. If it is too thick add a small amount of water until you get the consistency you like. Use to top the Pear Caramel Ice Cream. This also is a nice topping for your oatmeal in the morning.
Wednesday, June 16, 2010
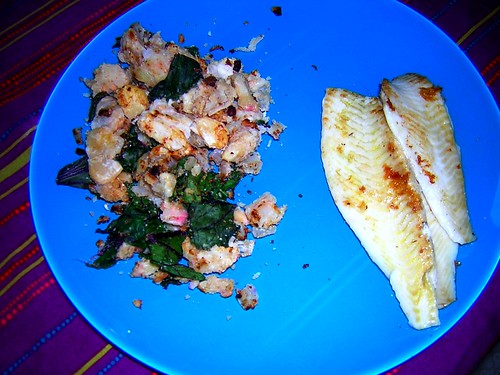
Greens and Beans
They might not be pretty but these beans have sole.
This is my go-to for when there are random greens wilting in the crisper and random beans threatening to turn evil because I made too many for another recipe earlier in the week. I can't believe it's taken me this along to post about this considering I eat some variation of it once a week at least. But here it finally is ready for you to bask in the awesomeness that is it's ease of preparation and it's ability to use up those pesky left over ingredients in a tasty way.
The great part of this recipe is you can change it up with whatever combo of greens and beans you have on hand. White beans are best: garbanzo, fava, navy, cannellini, or giant white lima beans are all beans I've used with success. Then mix and match your beans with spinach, kale, rainbow chard, beet greens, or pretty much any other dark leafy green you happen to have around. Lima beans with beet greens and a drizzle of lemon juice or garbanzos with kale and some fresh rosemary are my favorite combination but feel free to mix and match and let me know what you come up with.
Greens and Beans
1/2 pound of dried beans (or about 2 cups left over, cooked beans)
3 tablespoons oil
2 cloves garlic, diced
rosemary, lemon juice, or other seasoning (optional)
salt and pepper, to taste
handful of greens
If you're starting out with dried beans prepare them according to package directions. Once you have your beans prepped, in a large (preferably non stick) pan, heat the oil over medium high heat. When the oil is hot, toss in the beans and cook them, agitating them every so often so that they don't burn, for about 15 minutes or until they are browned on all sides. If your beans are sticking to the pan or drying out too quickly, pour in a little more oil to moisten things up.
Once the beans are toasted, lower the heat a bit and add the garlic, any other seasoning you would like and sprinkle with salt and pepper. Cook for another couple minutes or until garlic is to your preferred level of doneness. Now add some greens and allow the warm beans to wilt down the greens. Once your greens are wilted you're ready to eat.
Tuesday, June 15, 2010
Chickpea "Fries"
Just because I'm on a crazy diet doesn't mean I can't have an urge for a burger and fries. And because I'm highly motivated to satisfy my cravings while sticking to the parameters of the diet I made it happen in a weird and wonderful way.
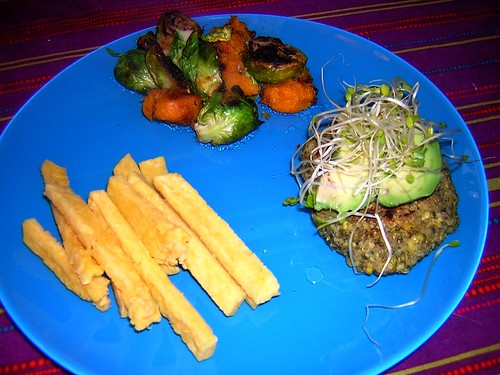
For burgers we had the very hearty and healthy Quinoa and Mung Bean Burgers from The Whole Life Nutrition Kitchen blog. They are the people whose elimination diet I'm on so I figured they knew what they were doing. With some avocado and sprouts they did the trick though without citrus they were a little bland. Apparently I need to come up with a citrus substitute that doesn't lead to migraines. Hmm.
Since I'm testing chickpeas to see if they cause a reaction (so far so good...yay!) I found a recipe for chickpea flour "fries" that seemed way too interesting to not try. They are a little labor intensive but as a potato substitute, it is well worth the effort. Next time I would mix something interesting directly into the batter though because they were hard to season after cooked.
This diet also has had the odd side effect of me craving odd things like Brussles sprouts which I was never a fan of before. So I threw together some pan braised Brussles sprouts with some butternut squash thrown in to make then even tastier. This randomly chosen flavor combination is one I keep recreating week after week. I even got the fella to eat one Brussles sprouts while calling me "mom," I don't even think he tried to feed it to the dog.
For burgers we had the very hearty and healthy Quinoa and Mung Bean Burgers from The Whole Life Nutrition Kitchen blog. They are the people whose elimination diet I'm on so I figured they knew what they were doing. With some avocado and sprouts they did the trick though without citrus they were a little bland. Apparently I need to come up with a citrus substitute that doesn't lead to migraines. Hmm.
Since I'm testing chickpeas to see if they cause a reaction (so far so good...yay!) I found a recipe for chickpea flour "fries" that seemed way too interesting to not try. They are a little labor intensive but as a potato substitute, it is well worth the effort. Next time I would mix something interesting directly into the batter though because they were hard to season after cooked.
This diet also has had the odd side effect of me craving odd things like Brussles sprouts which I was never a fan of before. So I threw together some pan braised Brussles sprouts with some butternut squash thrown in to make then even tastier. This randomly chosen flavor combination is one I keep recreating week after week. I even got the fella to eat one Brussles sprouts while calling me "mom," I don't even think he tried to feed it to the dog.
Chickpea Fries
2 cups water
1 cup chickpea flour
1 tablespoon olive oil
salt and pepper, to taste
oil for frying
Put 2 cups of water in a medium pot on the stove to bring to boil.
Grease a small baking sheet with a rim and set aside.
When the water is boiling turn heat down to medium low and, slowly begin adding the flour in a bit at a time whisking well so no lumps form. Continue this process until all the flour is combined with the water and you have a very thick polenta like paste. Stir in the oil and salt and pepper at this point, mixing well. Keep stirring as you let the mixture cook for one minute.
Turn the mixture out onto the greased baking sheet. Careful it's super hot! If you have what I call "barista fingers" that can handle the heat, begin flattening out the mixture until it is about 1/8 of an inch thick. If you are like my fella and have lily white programmer's fingers you might need to press this mixture out with a barrier (like a silicone mat or greased parchment paper) between you and the hot goop because you really do need to work with this while it is still quite warm.
When you have it flattened out into a sheet of chickpea goo place the baking sheet in the fridge for 30 minutes or over night.
When you're ready to eat the "fries" take them out of the fridge and use a pizza cutter to cut them into your preferred shape, the recipe suggests triangles but I wanted mine to cook faster and look like fries so I cut them thin. Pour about 1/4 inch of oil in the bottom of a frying pan and bring up to temperature. Fry the pieces of chickpea batter in small batches for about 3 to 4 minutes. When they are slightly golden brown on the edges remove from oil to a plate covered with paper towel. While they are still warm, sprinkle with salt or rosemary for added flavor.
Original recipe from Mark Bittman's How To Cook Everything.
Subscribe to:
Posts (Atom)