Thursday, October 14, 2010

I've Moved!

Sorry to all my faithful readers and any new comers that happened this way in the last couple months but I've quite obviously been away.  The fella, our fluffy dog, and I decided to say tata to Wisconsin and a big happy hello to Portland, Oregon.  It has been an epic adventure. The moving cross country and all the packing, unpacking, and job hunting that goes along with it was pretty all consuming and sadly the blog and my cooking have suffered.   Now that I've unpacked the kitchen and found all the gluten free friendly grocery stores I'm ready to get back to cooking fabulous things.

The sad news for all my French Diet followers is I've learned that being gluten free and finding out my other allergies are pointing me towards eating mostly vegan, doesn't allow me to do the Montignac Method any longer.  So unfortunately I'm stepping down as the queen of braised cucumbers and becoming mistress of local food for the dietary restricted here in Portland.  The Year on a French Diet blog will stay here for everyone's enjoyment and I might update every once in a while but I'm moving on to other things.

Which brings me to my new blog Gluten Free Vegetarian in Portland.  It is pretty rough shape at the moment since I don't have much energy to put into designing it but I hope you'll follow me over there as I explore food in the Pacific Northwest. 

It's been a fun ride.  Feel free to email me about French Diet stuff if you like, I still think it's a great style of eating it just doesn't work for my overly picky body.  But I still highly recommend it to those that want to give it a try.  Hope to see you all at my other blog!

Tuesday, July 13, 2010

Quinoa and Asparagus Salad

This is another one of those insanely easy side dishes that would be well suited for taking to a summer picnic.  I made the quinoa earlier in the week during a cooking frenzy so when it was time prepare this recipe all I did was toss it together and eat.  It's filling, delicious, and just spicy enough to keep things interesting.  I of course made it vegan my using dairy free butter spread but I'm sure it's even better with the real thing.

I didn't change a thing so this very short post is brought to you by my love for 101Cookbooks where you can find the recipe for this simple salad.  Go check it out if you've been hiding under a rock and haven't discovered this trove of healthy whole food recipes.

Monday, July 12, 2010

White Bean Dip

This is what dinner looks like when I neglect to plan out recipes ahead of time.  Don't get me wrong, it was delicious but more random than I'm used to.

The fella and I were both hungry and uninspired.  All we had were a couple random vegetables and a bunch of dry beans that no one wanted to put the effort into boiling.  Then while looking through the oddities of my cupboard I found one can of white beans neither of us could remember buying.  Not one to look down upon random dinner providing beans, I whipped them into a dip I remembered seeing in my food blog browsing earlier in the day.  And tada we had protein and an almost balanced meal.

I'm not a fan of raw garlic (it's not a fan of me either I found out in my elimination dieting so at least the feeling is mutual) so I cooked mine before adding it.  But if you're a the garlicky-er the better type and loss in a few cloves raw, this is the easiest dip imaginable.  It's like hummus for when you're all hummus-ed out or not in the mood to plan ahead for soaking chickpeas.  Especially on the forbidden corn chips this dip was extraordinary. 

White Bean Dip

1 tablespoon olive oil
2 cloves garlic, finely chopped

2 cups (or 1 15-ounce can) cooked white beans
1/4 cup olive oil
1/4 cup vegetable broth
2 sprigs fresh thyme
1/2 a lemon, juiced 
salt and pepper, to taste


If you decide to cook the garlic, saute it briefly in the olive oil over medium heat just until it is no longer raw before tossing in the food processor.


If using canned beans, drain and rinse them, then place in food processor.  If using dried beans, cook 1 cup of white beans of your choice using your preferred method and put in food processor when cooked through.


Put all of the remaining ingredients in the food processor with the garlic and beans and pulse a few times until the mixture is very smooth.  Check the seasoning to see if more salt, pepper or thyme is needed.  Also add additional liquid at this point if you would like the dip to be thinner.  Blend again until well combined. 

Modified from an original recipe at Affairs of Living blog.

Tuesday, July 6, 2010

Adzuki Bean and Mango Curry

In case you've never tried adzuki beans let me tell you that you're missing out.  They have the texture of a black bean and a flavor along the lines of a sweeter version of a kidney bean.  You can use them in place of any similar sized bean for something different. 

The only problem is these pretty pink beans are a bit hard to track down.   I get mine in the bulk pins at Whole Foods (I know it's a gluten free no no but I wash then thoroughly and have never had a problem.)  Eden Organics also has them canned flavored with seaweed at all the local groceries I go to so they are out there if you look.

Putting beans regardless of how unique they are with mango in a curry might sound odd.  I thought so too until I actually gave it a try.  The sweetness of the mango mellows the spices and gives this curry a really interesting mouthfeel making it seem much richer than it really is.  With the coconut milk included this either becomes a weight maintenance only dish or a curry to eat while skipping the rice.  To make this for a low fat/high fiber meal just sub out the coconut milk for some vegetable broth and add a bit of tomato paste to get a thick sauce without the fat.

I found this Adzuki Bean and Mango Curry recipe over at the City Life Eats blog along with a handful of other really tasty ideas for recipes for us picky allergic eaters.  It's sometimes a hard blog to navigate but this recipe is perfect so I'm just sending you over there to check it out since I didn't change a thing.

Monday, July 5, 2010

Peanut Butter Brownies with Chocolate Chips


This is my attempt at modifying another recipe from the Lisa's Kitchen blog to make it gluten and sugar free.  I was hoping to make it 100% Montignac friendly as well but I couldn't justify putting almond flour in something with a cup of peanut butter in it so I used brown rice flour instead.  That means this is a decent treat for dessert on the maintenance phase since it just has a hint of carby goodness in it instead of a refined flour.

My version isn't perfect as its a little dry so feel free to play around with the ingrediants and let me know if you could up with a different flour ratio.  Besides slightly dry baked goods are an excuse to have ice cream along side it and ice cream makes everything better.  And we all know how well peanut butter and chocolate go together so there really isn't anything else I should have to say to sell you on these yummy bars.


Peanut Butter Brownies with Chocolate Chips

7 tablespoons of melted vegan shortening (I used Earth Balance butter flavor spread)
1/2 cup plus 2 tablespoons agave nectar
1 cup crunchy peanut butter (divided use)
1 large egg
1 teaspoon vanilla
scant 3/4 cup chickpea flour
scant 1/2 cup brown rice flour
2 tablespoons arrowroot powder
1/4 teaspoon baking soda
3/4 teaspoon cream of tartar
2 ounces unsweetened baking chocolate finely chopped (or 1/2 cup chocolate chips)

Grease an 8 inch square pan with shortening. Line with parchment paper, leaving some overlap. Grease the paper in the bottom of the pan with more shortening.

In a large bowl, combine the melted shortening, agave nectar and 1/2 cup of the peanut butter until smooth. Beat in the egg and vanilla. Gently beat in the flours, arrowroot, baking soda and cream of tartar. Stir in the chocolate and remaining peanut butter.

Spread evenly into the prepared pan and bake at 350 degrees for 15 to 20 minutes or until it passes the tooth pick test.

Thursday, July 1, 2010

Cherry Chutney


Is it dessert or is it a condiment?  After thoroughly enjoying it a little at a time over the last couple of days I'm still not sure.  What I am positive about however is that it was easy to throw together, its tasty and very very interesting.

 Though I'm not sure what the original recipe has in mind I'm going to go along with the idea that this is mostly likely a dessert because I've liked it a lot after dinner with a scoop of whiskey flavored ice cream on top.  The ice cream was an experiment that went wrong in the texture department as it froze but is still tasty enough on top of other things.  The sweetness of the ice cream gives the cherry and vinegar combination enough kick in the dessert direction.  Originally this recipe calls for some tangy cheese as a topping which sounds intriguing and would probably bring this back over into the condiment/side dish category.

Which ever way you do it this is a very unique treat.  I was lazy and used frozen cherries rather than pitting endless cherries for this recipe and I can't taste any downside to the laziness.  I'm also cheap so rather than using a fresh vanilla bean I fished one out of my homemade vanilla and used part of that boozy goodness to make the chutney which I recommend.  But then I condone adding alcohol to most things. 

Cherry Chutney

3 cups (or 400 grams) red cherries, pits removed
3 cloves
1 tablespoon agave nectar
1 dried Szechuan pepper, crushed up a bit
3 tablespoons fruit vinegar (I used raspberry and fig vinegars from Vom Fass)
1 vanilla bean, scraped

In a medium size pot over medium heat mix cherries, cloves, agave nectar, Szechuan pepper.  Cover and let cook for 5-10 minutes or  until the cherries start to soften and turn into a jam like consistency. Add vinegar and reduce liquid for an additional 5-7 minutes. When the cherries are soft and look like a jam remove mixture from the heat, let it cool and serve in small bowls.  Serve topped with ice cream, whipped cream or some tart crumbly cheese.

Recipe adapted from one at the Citron and Vanille Blog.

Wednesday, June 30, 2010

Sun Dried Tomato Salad

Another day another perfect summer salad.  This one is courtesy of the Lisa's Kitchen Blog where there is no shortage of out of this world vegetarian recipes.  Whenever I want to cook a really unique curry this is the blog I go to because this is perhaps the only other person as obsessed with Indian cooking as I am.  She has some of the coolest recipes and flavor combinations, stuff I'd never think to cook.


Like this salad, I was a little leery of the cooked beans, raw veggies and lots of sun dried tomatoes combo but after I poured on the sun dried tomato dressing I became a believer.  The flavors are just what I was looking for an a warm afternoon when I didn't want to turn on the stove for more than 5 minutes.  The tomatoes and balsamic vinegar create a nice tangy edge for the beans. 

The fella who isn't a huge fan of tomatoes wouldn't stop eating this.  He said it was like a less evil version of mayo encased potato salad.  And he's right the parmesan cheese (I used a half nutritional yeast half ground almonds substitute for vegan parm) and garlic create a pleasant creaminess that reminded us both of mayo but without the heaviness and the fat.  And because there is no mayo involved this would be a killer salad for a picnic. 

This is another salad that is going into heavy rotation on my summer menus.

Tuesday, June 29, 2010

Vegetarian Mexican Salad

This is me trying something new in the hopes of posting more often.

When I cook something unfortunate or something that didn't work for me I'm going to post it and link to the recipe in case you want to give it a try and in the hopes you'll have better luck cooking it than I did.  Maybe you will cook it and love it then tell me where I went wrong.  I make plenty of mistakes I just don't usually take the time to post about them unless they are particularly epic.

And when I make something fabulous that was amazing but the recipe was perfect I'll just do an easy cheater post and point you in the direction of the talented blogger that created it.  This Mexican salad which is a knock off of a dish at Chipotle restaurant is a perfect example.  It comes from the Healthy Irishmen Blog  where chef Gavan Murphy, and sometimes his wife, post fabulous healthy recipes using fresh organic produce.  They  have some great recipes to browse through and aside from the potato and bread dishes most of his recipes are French diet friendly.

The recipe for Vegetarian Mexican Salad is especially worth checking out.  This is the kind of salad that always looks appealing at restaurants but I never think to try to make at home where I can control the fat and salt content.  Now that I know how I will be making this beauty all summer.  The super spicy and tangy dressing is my favorite part but if you aren't into breathing fire you'll want to take the amount of peppers down a notch.  I also cheated to make this salad even easier by buying some jarred salsa (because the fella won't eat raw tomatoes and I was lazy), mashing an avocado on my lettuce rather than making guacamole, and then sprinkling organic canned corn and some cilantro on the salad rather than making the corn salsa. And if you're on the weight loss phase you'll want to skip the corn all together since it has a high GI but there are so many other tasty things on this salad you won't be missing anything.

Friday, June 25, 2010

Pear and Caramel Ice Cream with Rasperry Topping

I've loved ice cream for as long as I can remember.  So it was only natural when I started cooking everything myself that I would eventually start making fabulous ice creams as well.  My fella was even awesome enough to buy me the best ice cream making book ever, David Lebovitz's The Perfect Scoop, for my birthday last year.  I started playing around with making some of the recipes with agave and fructose for the French Diet but never got around to posting about them because I was too busy licking the ice cream maker clean after each experiment.

More recently this same book has been just left sad and lonely sitting on my shelf as I did the elimination diet and found out how truly ill dairy in all forms makes me.  My body can try to deny me many things but the only thing I will not give up is ice cream.  Even if I have to buy $6 pints of coconut milk ice cream sweetened with agave nectar at Whole Foods I will neglect myself other things to afford that ice cream.  So I decided to go back to my favorite ice cream book and start cooking dairy free sugar free versions of some of David Lebovitz's recipes. 

I will not give up ice cream and I will not leave my favorite dessert cookbook to get dusty on the shelf.  So in between moving and looking for a new job in a new city across the country I'm going to treat myself to homemade dairy free ice cream.  This will be the summer that I dare to make dairy free ice cream amazing.

My first experiment was with the Pear Caramel Ice Cream I'd made a couple of times before with heavy cream and really enjoyed.  It's a simple recipe so I didn't have to make a lot of substitutions to make it work as a dairy free recipe.  The toughest part was playing with caramelizing agave nectar.  It is possible but it doesn't quite give the thick, dark, and slightly scorched flavor of caramelized sugar however.  But like many things in sugar free or gluten free cooking if you stop thinking about what you're missing and focus on the new flavor you're discovering its still super delicious.

Pushing the pears through a sieve is a pain in the butt, I know but it is worth it for the creamy texture the process gives you.  If you don't care then by all means eat the grainy slightly chunky mixture as it is or give it a go round in your food processor to break it up a bit.

This ice cream is even better with some raspberry topping to add a tartness to the almost overpoweringly sweet caramel ice cream.  And if you're really feeling out going this all goes great on my Gooey Hazelnut Flour Brownies.  These three things together make the ultimate dessert. But worry not the highly decadent ice cream holds up very well on it's own.   I end up eating the whole batch before I even have time to turn on the oven.


When your agave nectar starts to look like this you've achieved caramel.


Pear Caramel Ice Cream

3 medium-sized ripe pears, peeled, cored and diced
1/2 scant cup of agave nectar
2 cups full fat coconut milk
1/8 teaspoon salt
a few drops lemon juice

Pour the agave nectar into a heavy saucepan, cooking over medium high heat while watching it very carefully.  When it darkens and starts to look like the picture above (this will take awhile, 10 to 15 minutes) begin pushing the liquid around with a heat proof spatula so the middle doesn't burn.

When the agave is a uniformly dark color and syrupy thick stir in the diced pear.  The caramel might become hard or make scary hissing noise but don't be afraid keep adding the pears and stirring the mixture for about 10 minutes or until the pears are cooked through.

Remove the pot from the heat and add about 1/2 cup of the coconut milk and stir.  Now add in the rest of the coconut milk and a couple drops of lemon juice.  

Let this mixture cool to almost room temperature then puree in the food processor until smooth.  Press this mixture though a mesh strainer or sieve with your flexible spatula.  This will remove the tough fibers of the pear.

Chill this mixture then run it through your ice cream maker.


Recipe adapted to be dairy and sugar free from a David Lebovitz recipe in the Perfect Scoop.


Raspberry Topping

handful of fresh or frozen raspberries
drizzle of agave nectar
water, as needed

Drop the raspberries and a generous drizzle of agave nectar into the food processor and blend.  If it is too thick add a small amount of water until you get the consistency you like.  Use to top the Pear Caramel Ice Cream.  This also is a nice topping for your oatmeal in the morning.


Wednesday, June 16, 2010

Greens and Beans

They might not be pretty but these beans have sole.

This is my go-to for when there are random greens wilting in the crisper and random beans threatening to turn evil because I made too many for another recipe earlier in the week.  I can't believe it's taken me this along to post about this considering I eat some variation of it once a week at least.  But here it finally is ready for you to bask in the awesomeness that is it's ease of preparation and it's ability to use up those pesky left over ingredients in a tasty way.

The great part of this recipe is you can change it up with whatever combo of greens and beans you have on hand.  White beans are best: garbanzo, fava, navy, cannellini, or giant white lima beans are all beans I've used with success.  Then mix and match your beans with spinach, kale, rainbow chard, beet greens, or pretty much any other dark leafy green you happen to have around.  Lima beans with beet greens and a drizzle of lemon juice or garbanzos with kale and some fresh rosemary are my favorite combination but feel free to mix and match and let me know what you come up with.

Greens and Beans

1/2 pound of dried beans (or about 2 cups left over, cooked beans)

3 tablespoons oil
2 cloves garlic, diced
rosemary, lemon juice, or other seasoning (optional)
salt and pepper, to taste
handful of greens

If you're starting out with dried beans prepare them according to package directions.  Once you have your beans prepped, in a large (preferably non stick) pan, heat the oil over medium high heat.  When the oil is hot, toss in the beans and cook them, agitating them every so often so that they don't burn, for about 15 minutes or until they are browned on all sides.  If your beans are sticking to the pan or drying out too quickly, pour in a little more oil to moisten things up. 

Once the beans are toasted, lower the heat a bit and add the garlic, any other seasoning you would like and sprinkle with salt and pepper.  Cook for another couple minutes or until garlic is to your preferred level of doneness.  Now add some greens and allow the warm beans to wilt down the greens.  Once your greens are wilted you're ready to eat.

Tuesday, June 15, 2010

Chickpea "Fries"

Just because I'm on a crazy diet doesn't mean I can't have an urge for a burger and fries.  And because I'm highly motivated to satisfy my cravings while sticking to the parameters of the diet I made it happen in a weird and wonderful way.

For burgers we had the very hearty and healthy Quinoa and Mung Bean Burgers from The Whole Life Nutrition Kitchen blog.  They are the people whose elimination diet I'm on so I figured they knew what they were doing.  With some avocado and sprouts they did the trick though without citrus they were a little bland.  Apparently I need to come up with a citrus substitute that doesn't lead to migraines.  Hmm.

Since I'm testing chickpeas to see if they cause a reaction (so far so good...yay!) I found a recipe for chickpea flour "fries" that seemed way too interesting to not try.  They are a little labor intensive but as a potato substitute, it is well worth the effort.  Next time I would mix something interesting directly into the batter though because they were hard to season after cooked.

This diet also has had the odd side effect of me craving odd things like Brussles sprouts which I was never a fan of before.  So I threw together some pan braised Brussles sprouts with some butternut squash thrown in to make then even tastier.   This randomly chosen flavor combination is one I keep recreating week after week.  I even got the fella to eat one Brussles sprouts while calling me "mom,"  I don't even think he tried to feed it to the dog.


Chickpea Fries

2 cups water
1 cup chickpea flour
1 tablespoon olive oil
salt and pepper, to taste

oil for frying

Put 2 cups of water in a medium pot on the stove to bring to boil.

Grease a small baking sheet with a rim and set aside.

When the water is boiling turn heat down to medium low and, slowly begin adding the flour in a bit at a time whisking well so no lumps form.  Continue this process until all the flour is combined with the water and you have a very thick polenta like paste.  Stir in the oil and salt and pepper at this point, mixing well.  Keep stirring as you let the mixture cook for one minute.

Turn the mixture out onto the greased baking sheet.  Careful it's super hot! If you have what I call "barista fingers" that can handle the heat, begin flattening out the mixture until it is about 1/8 of an inch thick.  If you are like my fella  and have lily white programmer's fingers you might need to press this mixture out with a barrier (like a silicone mat or greased parchment paper) between you and the hot goop because you really do need to work with this while it is still quite warm.

When you have it flattened out into a sheet of chickpea goo place the baking sheet in the fridge for 30 minutes or over night. 

When you're ready to eat the "fries" take them out of the fridge and use a pizza cutter to cut them into your preferred shape, the recipe suggests triangles but I wanted mine to cook faster and look like fries so I cut them thin.  Pour about 1/4 inch of oil in the bottom of a frying pan and bring up to temperature.  Fry the pieces of chickpea batter in small batches for about 3 to 4 minutes.  When they are slightly golden brown on the edges remove from oil to a plate covered with paper towel.  While they are still warm, sprinkle with salt or rosemary for added flavor.

Monday, June 14, 2010

Chickpea Crepes With Smoked Salmon

Apparently I'm on a bit of a crepe kick. Probably because they are the only vaguely bread like food I can have on this elimination diet. 

This time I went savory with chickpea flour crepes, pesto, and smoked salmon.  The fella and I were both really surprised by how delicious I was able to make these while still keeping them hypoallergenic.  The crepes themselves were ridiculously easy and a nice compliment to the salmon.  The pesto which I used pumpkin seeds in instead of pine nuts rounded out the flavors nicely.  Best of all this recipe is totally weight loss phase friendly for the French Diet.  Since it involves bean flour you can put whatever you're in the mood for in these.  So go crazy!

Since I'm only cooking really simple foods that don't usually require any sort of recipe I'm going to try to stop neglecting this blog so badly and just post pictures of my food to prove that I really am eating well while on such a restrictive diet.  We'll see how long I can keep up that promise.


Chickpea Crepes 

1 cups chickpea flour (easily found in Indian groceries)
1 1/4 cups water
dash of salt
2 tablespoons olive oil

Whisk together all ingredients.  Heat a large non stick pan over medium heat.  When hot, spray with cooking spray and drop 1/4 cup of the crepe mix into the pan, quickly sliding around  the pan to spread out the crepe as thin as possible.  Cook for 30 seconds.  Flip and cook for 90 seconds on the other side.  Repeat with the rest of the crepe batter.

I topped my chickpea crepes with a handful of spinach, a slice of avocado, some sprouts, a drizzle of pesto, and a couple pieces of smoked salmon.  This would also be amazing with cream cheese or creme fraiche, smoked salmon, watercress, and cucumber.  (Someone eat that version and tell me all about it since I will never be able to.)

Friday, June 4, 2010

Rice Flour Crepes with Blueberries and Coconut Whipped Cream

I haven't been posting much lately because I haven't been eating much of interest.  

See the ridiculous thing is I'm a foodie with serious food sensitivities.  Figuring out that gluten was causing me problems helped out my digestive issues a lot.  Getting rid of dairy made me feel a lot better too.  However there were still things that seemed to be causing me problems and even after keeping a food diary, seeing a nutritionist, an allergist and a gastroentrologist I still couldn't figure out what was making me ill.  Unwilling to "just live with it" as all but one of my doctors advised I decided to take the next step and go on an elimintation diet.

The people over at Whole Life Nutrition Kitchen had one that seemed reasonable so I'm giving it a try.  Eating nothing but green smoothies for a couple days, giving up chocolate, coffee and alcohol and eating only the simplest of unseasoned foods has not been easy.  But after my body got over the initial shock I felt better than I ever had before.  If eating green salads and brown rice with lentils and nothing else was going to get rid of my unending digestive woes I was willing to do it.

At this point I've added in a few foods without any issues so I do have some variety in my diet.  So far I have sadly discovered citrus, cinnamon and parsnips are all problem foods for me.  So as this goes on I'll be healthier and feel great but my diet is getting more and more restricted.  In order to not let thoughts like that get me down I spent the afternoon plotting out a dessert that I could eat on this diet.  Something other than me peeling a mango and eating it like the crazy sweet-food starved person I am.  

Out of that I came up with this recipe for these vegan hypoallergenic rice crepes that fit with the strict parameters of the first phase of the elimination diet.  They are so amazing you would never guess they are missing things like eggs, dairy, wheat or sugar.  I went crazy and made some dairy free whipped cream as well since I was craving it but the crepes though simple are great without anything but your choice of fruit.  The fella and I enjoyed ours with blue berries while sitting out on the porch and enjoying the warm sunny evening.


Vegan Rice Flour Crepes 

1 tablespoon ground flax seed
2 tablespoons hot water

1/2 cup brown rice flour
1/4 teaspoon salt
1/4 teaspoon agave nectar

In a very small bowl mix the ground flax seeds with the hot water and mix well.  Allow mixture to sit undisturbed until it becomes very sticky.

In a medium bowl mix together the remaining ingredients until well incorporated then add in the flax seed mixture.. Your mixture will be very a little runny and gritty. 

Heat a nonstick frying pan over medium heat and gently grease it with cooking spray. When the pan is at temperature add 1/4 a cup of the crepe mixture to the pan and agitate the pan to roll the mixture around the bottom making it as thin as possible. Cook the crepe for one minute then flip and cook for a 1 1/2 on the other side.

Repeat with the remaining mixture, being sure to stir the crepe batter before putting it in the pan as the heavy rice flour will quickly sink to the bottom of the bowl in the time it has taken you to make the preceding crepe.


Blueberry Filling

1 cup frozen blueberries
1 teaspoon agave nectar

Place both ingredients in a small sauce pan over medium heat and allow to simmer until the melting berries turn into a thin syrupy mixture.


Coconut Whipped Cream

1 14-can full fat coconut cream (the kind that separates out)
1 tablespoon melted coconut oil
1 teaspoon agave nectar

Place a metal bowl and the beaters for your electric mixer in the freezer.  Open the can of coconut milk and place in the refrigerator until the solid part of the coconut milk solidifies a bit more and is easier to skim out of the can.

After about 10 minutes remove the coconut milk from the fridge and place the solid mass floating on the top of the can in the frosty bowl that was in the freezer, leaving behind the liquid part of the coconut milk to use for other purposes.  Add the coconut oil and agave nectar to the coconut milk and return the bowl to the freezer until the mixture becomes mostly solid but not frozen through.  This will take awhile, probably between 30 to 90 minutes.  Check it often.

When the coconut mixture is stiff, begin beating the mixture with the cold electric beaters.  You will get both some soft peaks and some cold ice creamy textured bits during this process.  It won't exactly be "real" whipped cream but its so delicious it won't really matter.

Tuesday, May 25, 2010

Chocolate Lava Cake

The only thing sexier than this beautiful little molten pile of chocolate is the woman who wrote the recipe.  

Suzanne Pirret is what would happen if Nigella Lawson and a sultry sex writer got together and decided to write a book.  She's my food writing hero.  She is hot and funny and totally engaging.  Not usually words one uses when describing a cookbook but this one is all those things and more.  Then again I suppose hotness its to be expected from someone wearing a form fitting white dress and 6 inch Louis Vuittons on the cover of a book called The Pleasure is All Mine.  Get your head out of the gutter, it's a book full of fancy but easy recipes for one because eating alone is no reason not to treat yourself well.

Seeing as I've been obsessed with this book as of late I've already shared her recipes for TomYum Kung Soup and Lemongrass Steamed Fish.  But I wouldn't be able to live with myself if I didn't write about the best recipe in the entire book.  It of course involves chocolate and is insanely decadent.  That didn't stop me from making this luscious melty mouth filling treat over a dozen times last week in order to experiment with getting the sugar free version of the recipe perfect.  It was tough but I made it through.  This is the type of rigorous testing I suffer through just for my loyal blog readers.     

In the end I came up with a gluten and sugar free recipe that is so good I couldn't tell the difference between the one that had sugar and the one that didn't.  I have to warn you though Suzanne Pirret says this is a single serving treat, unless you're immune to high doses of sexy chocolate induced caffeination you might want to find someone to share it with.  Or not who am I kidding it's too good to resist eating the whole damn thing.  

If you want to make the sugary version or need help figuring out how making this cake works check out this video for the recipe and watch Suzanne Pirret work her magic.  Someday I'll be the type of person coordinated enough to wear a designer dress and high heels while working with chocolate.  Or at least I can dream.


Chocolate Lave Cake

3 ounces unsweetened dark chocolate

1 tablespoon butter (soy butter also works nicely)
3 teaspoons fructose
1 egg

 1 tablespoon almond flour
1 dash sea salt

unsweetened cocoa powder
drizzle of agave nectar

Preheat the oven to 360 degrees.

In a small sauce pan over low heat very slowly melt the chocolate.  When chocolate starts to melt, briefly remove pot from heat and stir, then place back on heat to further melt.  Repeat the process until chocolate is completely melted and set aside to cool a bit.

Melt the butter in a small mixing bowl then whisk in fructose and egg until well combined.  Slowly begin to drizzle in the melted chocolate, whisking as you pour.  You want to add the warm chocolate a little at a time so it doesn't cook the raw egg.  The mixture should be very stiff and thick at this point, too dense to stir easily and that is the perfect texture.

Add in the flour and salt and stir once again briefly. 

Grease a small ramekin then sprinkle the inside with cocoa powder.   Tap the sides of the ramekin to remove any excess powder then pour the batter into it.  Bake for 9 minutes.  Don't over cook!  

When the cake is done cooking it should be firm on the outside but liquid on the inside.  If you tip the cake over a plate and it slides out it's done.  Drizzle with agave nectar or top with ice cream to take an edge off the bitterness of the chocolate.

Modified to be sugar and gluten free from a Suzanne Pirret recipe in The Pleasure Is All Mine.

Monday, May 17, 2010

Lemongrass Steamed Fish

Over on the other blog I write for I've been blathering about how much I love Asian markets and all the crazy ingredients that are to be found there.  Last week I wrote about all the crazy things I bought on my last trip through the Asian groceries of Madison and today I posted a delicious and easy soup recipe that I used to combine all the things I bought.   Now Tom Yum Kung soup is one of my favorite things to make. It seems complicated but it comes together super easily.

The only problem with a recipe like that and all the specialty ingredients is you are inevitably stuck with left over bits of things you have no idea what to do with.  Like lemongrass tends to come in big bunches but each recipe only calls for one stalk, so what to do with the rest?  Or you managed to track down lime leaves and galangal and they were kind of expensive so you don't want the rest to just rot, now what?

Steamed fish is the perfect solution.  Gather all the left over bits of Asian oddities and pile them on fish, wrap them up in parchment and you have an easy but creative dish that will save those stalks of lemongrass from going to waste.  It isn't pretty but it's very tasty and with just enough spice to be exciting.


Lemon Grass Steamed Fish

2 fillets of swordfish or other meaty fish
2 dried red chili peppers, chopped
2 limes, zested
4 thin slices of galangal (or ginger)
2 stalked lemon grass, bashed up with the edge of a knife and cut into 2 inch lengths
1/2 cup sake or white wine
2 dashes of fish sauce

Preheat the oven to 400 degrees.

Cut two pieces of parchment paper a bit larger than your pieces of fish.  Pat dry each fish fillet and season with salt and pepper on both sides before putting each piece of fish on a square of parchment.  

Sprinkle the top of each piece of fish with chili pepper, lime zest, galangal and lemongrass.  Now comes the interesting part.  Using string or staples gather together the parchment so that the fish is wrapped up like a present with just a small opening at the top of the packet.  When the fish is secured in the parchment, carefully pour 1/4 cup of sake into each wrapped up piece of fish.  Then drizzle in just a little bit of fish sauce to each fish packet.

Bake for about 20 minutes or until a knife stuck into the fish meets little resistance.  Be careful unwrapping the fish so that you don't get burnt by the steam.  


Monday, May 10, 2010

Gluten Free Banana Cardamom Bread

Photo by Steve Apps of The State Journal.


I had no idea when the article was going to be printed so I didn't get a chance to warn people to keep an eye out for it.  So in the ennui filled late hours of the afternoon when they were both probably hiding from work in separate break rooms both the fella and my friend Tim texted me nearly the same sarcastic message.  "There's a great article on going gluten free in the paper you should look at."  

And there I was in the paper.  Well not technically me, more like my bread.  Even Lindsay who wrote the article isn't sure why there are three pictures of bread and no pictures of me in  the print article.  I guess the bread was just more photogenic than me.  Le sigh.  Given how great the pictures of my baking came out I'm thrilled they got all that attention though.

This loaf doesn't technically fit in with the French Diet considering the higher GI flours and the bananas but for the weight maintenance phase it would be a nice breakfast bread.  The diet aside, this bread is surprisingly good,  I made it and even I was blown away.  

The fella had this great recipe for a banana cardamon loaf he used to make when we were first dating so when I needed an idea for another bread recipe I decided to use that recipe to reverse engineer it into a gluten free version.  And it worked out really nice.  Gluten free it isn't quite as fluffy but since it's a desserty bread it doesn't interfere with the enjoyment of it at all.  Smeared with a little honey the fella and I really enjoyed nibbling on it with Lindsay and her fella literally seconds after the photographer got done with it.  It smelled that good we couldn't resist any longer.

Gluten Free Banana Cardamom Bread

2/3 cup warm water (temperature around 110 is best)
1 teaspoon yeast
1 generous pinch of sugar

3 cups Bob Red Mill Baking and Biscuit Flour blend
1/2 cup ground flax seed
1 tablespoon ground cardamom
1 teaspoon salt

2 tablespoons honey or agave nectar
2 very ripe bananas well mashed

arrowroot or tapioca starch to flour work surfaces
1 teaspoon sesame seeds

Put the warm water in a small bowl.  Whisk in the yeast and sugar and let stand about 10 minutes or until it turns bubbly.  If the water doesn't become frothy it means the yeast isn't active and you need new yeast or the water was too hot or cold to activate it so try again.

Stir together the dry ingredients in a mixing bowl.  When well combined add in the yeasty water, honey, and bananas.  Gradually incorporate the mix into a soft dough with a wooden spoon and your fingers, adding a little more water if necessary to get a dough like consistency that isn't too dry and crumbly. 
Dust a cutting board or very clean counter with arrowroot or tapioca starch (you don't want to add anymore flour to the dough, you want to use a sticky starch that won't dry out the bread for this purpose).  Knead the dough for a minute or so until it is sticky and well combined.  Return it to the bowl and cover with a damp dish towel to allow to rise for about 2 hours or until the dough has doubled in size.

After it has risen, remove the dough from the bowl back to the dusted work surface and divide into three equal pieces.  Roll each piece into a short fat oblong shape and braid the three together.  Place the dough on a greased baking sheet and loosely cover with plastic wrap.  Let stand until it rises a little bit again.

Preheat oven to 425 degrees.  Brush the dough with a bit of water and then sprinkle with sesame seeds.  Bake for 10 minutes then lower temperature of oven to 400 degrees.  Cook for a further 15 minutes or until the loaf is browned and sounds hollow when tapped.

This will be a very dense dessert like loaf of bread and is best served with a little honey or raspberry jam.  Store in a tightly sealed container in the refrigerator. 

Friday, May 7, 2010

Look Ma My Bread is Famous

 Photo by Steve Apps of the State Journal.

The interview I did with my foodie friend Lindsay for the local newspaper here in Madison just went up today.  As you may know May is Gluten Free Awareness month so she talked to me and a couple other people in the Madison gluten free community about our experience of going without wheat.  And the most important part of the whole thing of course was the food. 

I cooked four different very photogenic loafs of bread that the paper's photographer did a great job of capturing.  I'll post the recipe for the banana cardamom bread I reverse engineered from the fella's favorite gluteny recipe next week.  The other three recipes are from some of my favorite gluten free bloggers so be sure to check those out in the article as well.

It was a fun experience.  Now that people know what I'm doing over here I better get back to some serious blogging.  But after all that baking I need some time off from making bread.  I'm all breaded out.

Monday, May 3, 2010

Sorrel Quiche

It's CSA season again.  That means its spring (yay no more snow!)  And it also means weekly confrontations with vegetables you have never seen before.  Sorrel? Ramps? Nettles? Say what?  I find it extremely exciting to hunt down recipes for these new vegetables, its like a treasure hunt than ends in a great meal.

This year the fella and I weren't able to go for a CSA since we'll very likely be moving out of state in the next couple of months and didn't want to abandon our box of veggies halfway through the season.  Instead the fella has been enjoying going to the farmer's market each Saturday and playing a little game called "stump Emily with wacky produce."  The star of the first episode of this little adventure was sorrel.  It's in a lot of French recipes but what do you do with it when you have a grocery bagful?  That's a very good question to which I answer; quiche!

But if you're on my site you're either on a low carb diet or just enjoy my typo ridden recipes and I'm gluten free so how do you make a tasty crustless quiche?  In this case covering the bottom of the pie plate with goat cheese worked out nicely as a crust substitute.  In fact this recipe was just all around fabulous and easy.  If you don't have sorrel go for spinach.  And if you're avoiding cow milk cheeses here is a fun tip: ground raw cashews taste very similar to Parmesan so it's a great thing to sprinkle on quiche or pasta without the unpleasant lactosey side effects.

Sorrel and Goat Cheese Quiche

5 ounces chevre
3 cups sorrel, coarsely chopped
1 handful scallions, chopped
4 eggs
1 1/2 cups soy milk
1/4 teaspoon salt
1 handful ground cashews (or Parmesan cheese)

Preheat oven to 375 degrees. Spread goat cheese (or any strong flavored cheese) in the bottom of a well greased pie plate.  Cover with chopped sorrel and scallions. Beat eggs, salt and milk together. Pour over greens. Sprinkle with ground cashews. Bake for 35 to 40 minutes or until top is golden brown.

Tuesday, April 27, 2010

Organic Gluten Free Low GI Double Down Insanity

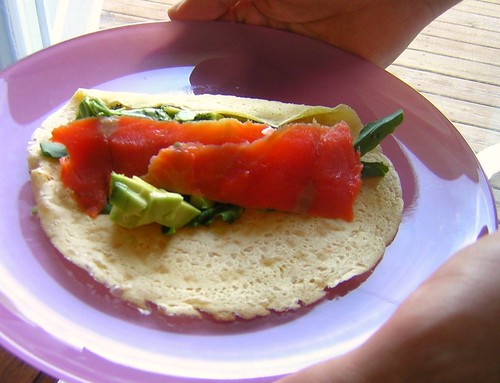
Unless you are very lucky or have been living under a rock you may have heard of the new sandwich Kentucky Fried Chicken recently released called the Double Down.  It is two breaded chicken patties (or you can get the grilled version if you're watching your girlish figure), bacon, cheese, and the frightening sounding Colonel's sauce which is basically spicy mayo.  No bun, no bread, instead it gets wrapped up in a baggy so the copious amounts of grease don't roll down your sleeve.  Sounds great, right?

It has been impossible to ignore especially as a serious foodie.  At least once a day someone is talking (okay usually rending their hair at the creation's ick factor) about this sandwich.  The Jamie Olivers of the world are declaring it the food equivalent of the apocalypse and basically acting like it will be the down fall of civilization.  While the Anthony Bourdains shrug at its impressive caloric content while admitting that it kind of looks like it would be fun to try just once.

I fall somewhere in the middle.  It is a rather unnecessary calorie bomb and the world doesn't really need another bit of junk food.  On the other hand people already eat crap and this actually isn't near to the worst thing you can get in the world of fast food.  Its kind of impressive actually how much press this silly breadless sandwich has gotten and though they are a bit late to the trend it was nice to see a low carb option being marketed.

But mostly I'm just sick of hearing about it.  So after an acquaintance of mine ate one and lived to write about it I decided I would make a Double Down that I could eat.  It would be my protest against fast food to try to make a less coronary inducing version of this monstrosity.  The joke was on me however.  By trying the old low carb meat dredging trick of substituting ground nuts for breading  I may have actually made a sandwich even worse for you than the original.  Now that is impressive!

I did however make it will all organic and gluten free ingredients which is not something you are ever going to find in a fast food restaurant any time soon.  So with that small victory I will admit the most embarrassing part of this whole qualifier heavy post is this... 

This was one of the most delicious things I have ever eaten!

There I admitted it and as an proponent of healthy eating I shall now hang my head in shame.  The thing is though, Michael Pollan is right, if you are going to eat something this bad for you then you should make it for yourself for two reasons.  One is you can control the quality of the ingredients, limit the calories where possible and if you have to take the time to prepare it you can't impulse eat it.  And secondly after you learn what goes into certain things and how gross and greasy they are you will never ever want to put them in your mouth again.

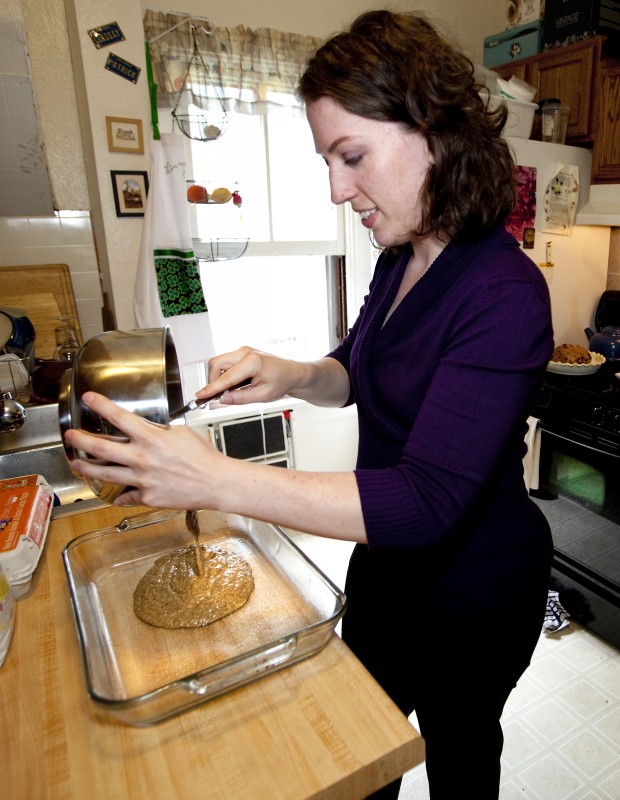
For example I decided to make homemade mayonnaise for this recipe because I never had before and didn't want to buy a tub of it at the store.  Like so many things Julie Child makes it sound so freaking easy.  This woman had to have the arms of an ox because halfway through the process the fella and I were all out of arm strength in all of our combined appendages.  And after whipping a cup and a half of oil into two egg yolks I realized how sickening mayonnaise is, now that I really truly know what goes into it I have no desire to ever consume it again. 

Which is how I ended up feeling about this entire experiment; it was a fun adventure but I will never do it again.  In fact if I had to suggest to someone how to make a less evil Double Down I would say add some cayenne to the breading, skip the bacon and go light on the cheese.  The mayo and the bacon added nothing to the sandwich.  I know, its blasphemy to speak poorly of bacon but hear me out. 

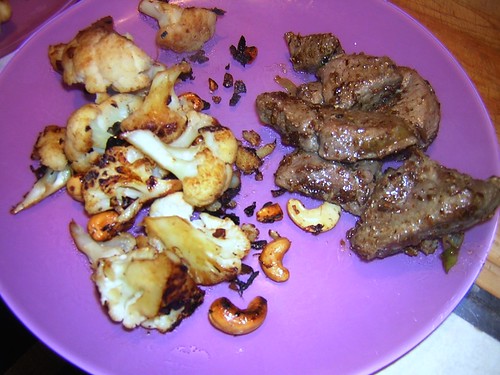
The fake KFC seasoning mixed in with the ground pecans were what really made this a treat.  That was the truly delicious part and the copy cat blend of spices did taste amazingly like how I remember the real Kentucky Fried Chicken tasting.  So I would perhaps bread chicken that way again in the future.  The other crazy piles of stuff on this sandwich and the extra chicken breast are really just for show.  And it succeeded, we now how far KFC is willing to go to get press.  It worked, we're talking about them, even I gave in to the trend.  Darn it.


Organic Gluten Free Low GI Double Down Insanity

1 cup finely ground pecans
1/2 teaspoon paprika
1 teaspoon garlic salt
1 teaspoon onion salt
1/2 teaspoon dried oregano
1/2 teaspoon dried rubbed sage
1/4 teaspoon dried powdered rosemary
1/4 teaspoon dried powdered thyme
1/2 teaspoon dried parsley
1/2 teaspoon salt
1/2 teaspoon ground black pepper

1 egg 
1/4 cup rice flour
2 large chicken breasts
4 tablespoons oil

4 pieces of cooked bacon
4 slices of cheese (I used organic goat "cheddar")
2 tablespoons of spicy mayo (recipe to follow)

Using a spice or coffee grinder, finely chop the pecans.  They will turn wet and sticky very quickly while being ground so make sure to watch their consistency so that you don't end up with pecan butter.  Also use the grinder to powder any of the spices that aren't already ground.  Mix the spices and the ground pecans in a shallow bowl.

Whisk the egg in another shallow bow and set aside.  Place the rice flour in yet another shallow bowl.

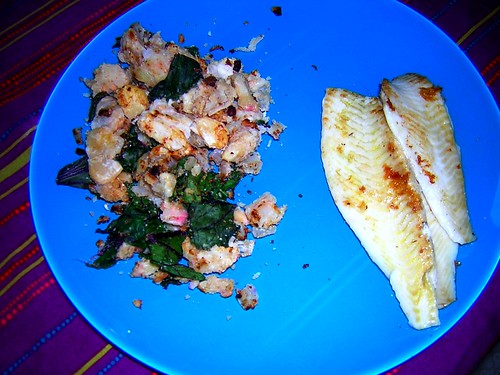
Using a mallet pound the chicken breasts until they are an even thickness, about 1/4 inch.  You should have two very large mostly flat chicken breasts.  Cut each into 2 equal sized pieces so that you now have four pieces of thin chicken breast.

Warm the oil over medium high heat in a non-stick pan while you batter the chicken.  First dust the chicken breast with the rice flour.  Next coat the chicken in the egg.  Lastly dredge the chicken in the pecan and spice mixture until well coated.  When the oil is warm pan fry each piece of chicken, trying to avoid burning the pecan coating by flipping the chicken often and keeping the temperature low.  Cook until the inside of the breasts are cooked through then set aside.

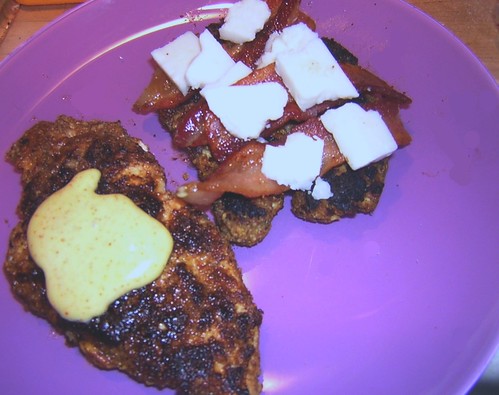
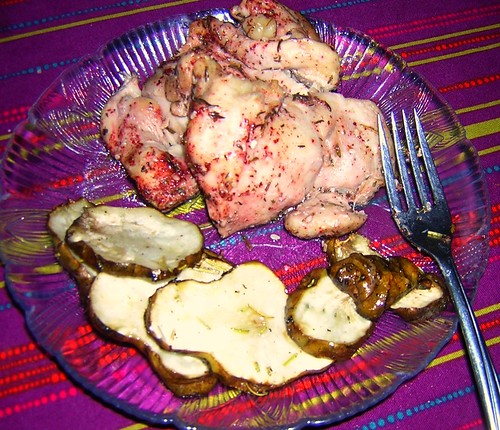
Place two chicken breasts on a plate to beginning assembling the sandwich. Place two slices of bacon and  2 pieces of cheese on one of the chicken breasts and 1 tablespoon of the mustard on the other breast.  Fit the two prepared chicken breasts together like a sandwich.  Repeat with the remaining ingredients to make the second sandwich.

Copycat KFC seasonings from this website.


Spicy Mayo

1/4 mayo (make your own or from a jar if you like)
1/2 teaspoon cayenne
1/4 teaspoon paprika 

In a small bowl mix everything together well.

Tuesday, April 20, 2010

Coconut Flour Bread

This is literally the easiest bread recipe in existence.  The hardest part about it is finding the coconut flour to cook it with.  Coconut flour I must warn you is not cheap.  I think a pound was $12 at my local grocery store.  But it is worth it for the experience and to try a totally new flour.  Coconut flour is ridiculously high in fiber and about a 45 on the glycemic index so it is perfect for this diet.  I really enjoyed having a bread that was different than anything else I've ever baked, it's naturally sweet and has a crisp outside and tender chewy middle that makes it have the mouth feel of toast without actually requiring a toaster.

Actually a word of warning on that issue, unless you have a very narrow toaster, because this makes such a tiny loaf the bread, it will just fall in the toaster never to be heard from again.   So if you want it warm just stick it in a warm frying pan for a minute or so to get warm.  Another thing, grinding up unsweetened coconut you already have at home will not make coconut flour no matter how finely you grind it.  Believe me I've tried and I haven't figured out how to fake it with out lumpy horrible results so this is one case where I'm going to have to advise you to suck it up an pay full price at the store for it.  You won't be sorry you did. 


Coconut Flour Bread

6 eggs
1/2 cup melted coconut oil 
1 tablespoons agave nectar
1/2 teaspoon sea salt
3/4 cup coconut flour 

Mix all ingredients together and pour into a small buttered loaf pan. Bake at 350 degrees for 40 minutes. 

Monday, April 19, 2010

Swordfish and Olive Pasta

The fella and I were both extremely wary of this meal as we were cooking it.  Fish plus pasta seemed curious and had a likelihood to not be as tasty together as the two delicious bits are separate.  In this case the genius of the recipe won out over our doubts.  Not only is it a very yummy recipe it is also very easy.  The meaty texture of the broiled fish contrasted nicely with the pasta which then covered with the salty bits of caper and olive made a nicely balanced meal.  This recipe is going into our rotation of quick filling things to make when I don't feel like cooking.


Swordfish and Olive Pasta

6 ounces of swordfish
2/3 cup black olives, finely chopped
salt and pepper
6 ounces curly pasta (gluten free rice rice pasta works well)
2 large shallots, thinly sliced
2 cloves garlic, thinly sliced
3 tablespoons olive oil
1 teaspoon herbs de Provence
4 tablespoons capers
1/ 2 starchy water reserved from boiling pasta
fresh parsley

Line broiler rack with aluminum wrap, rub on a little oil, set fish on top and broil 4 minutes on one side.  Turn the fish, top with olives and broil 2 or 3 minutes longer.

Bring a large pot of salted water to a boil and drop in the pasta.  While it cooked, saute shallot and garlic in the olive oil over low heat until they are soft, don't let them brown.  Add the herb de Provence and capers.  Slice the swordfish in thin strips and spoon the olives into the shallot mixture.

When the
pasta is al dente, drain it, reserving 1/ 2 cup of the cooking water and mix the pasta in with the swordfish,adding pasta water a little bit at a time as needed to moisten the pasta in order to make a few tablespoons of sauce to cover the pasta.

Salt and pepper the dish.  Toss one last time and top with parsley to serve.

Monday, April 12, 2010

Double Chocolate Flourless Torte

It has been a hell of a day over here in my world so I'm going to just let this fabulous chocolate treat speak for itself.  Long story short; it's amazing and easy and I wish I had not already eaten it all so I could have some right now in my time of need.  Also please feel free to oo and aw over my new dessert plates.  That's all.


Double Chocolate Flourless Torte

1 cup dark chocolate (4 one-ounce squares)
1/2 cup almond flour
1/4 cup cocoa powder
1/2 teaspoon salt
3 eggs
1/3 cup agave nectar
1/2 cup oil

Preheat oven to 350 degrees.

Break up the squares of dark chocolate a little bit (I used unsweetened baking chocolate and still thought the recipe was too sweet) then place in food processor and pulse until coarsely ground.  Remove 1/2 of the ground chocolate for later. 

Add in almond flour, cocoa powder, and salt and combine for a couple more seconds in food processor.  Add eggs to food processor and pulse again, then add in agave, oil and orange zest.  Combine until smooth.  Add the remaining 1/2 cup of chocolate pieces back to the mixture and stir briefly.

Transfer batter into a well greased 10 to 12 inch round pan.  Bake for 20 to 25 minutes or until it passes the tooth pick test.

Adapted from a recipe on Elana's Pantry.

Wednesday, April 7, 2010

Spicy Goat Cheese Dip

Since I'm fessing up to my astronomical failures as a cook allow me to confess to another ridiculous thing I cannot manage to succeed at.  Nachos.  You heard me correctly.  Melted cheese and tasty fixings over chips.  Couldn't be simpler, right?  Anyone can do that.  Yeah anyone except me it would seem.  Having never attempted to make them before I thought the broiler would be the way to go.  30 seconds later I was waving out the fire on my organic blue corn chips.  Another dinner ruined.

In my defense nachos were never something we ate in my house growing up.   And the horrible alien cheese sauce drenched corn chips at the fair or the mall aren't nachos those are just wrong.  So I don't have a food memory of this dish to lead me to create a long forgotten favorite recipe.  All I had was a strange craving for cheesy corn chips after eating a quick meal at the Great Dane (a locally famous brew pub with good beer and a gluten free menu) and being mocked by the monster nacho plate being eating by people at a neighboring table.

Giving up cheese in Wisconsin is like giving up on snow in the Arctic, it just isn't possible.  It is everywhere and it knows where to find you when you least expect it.  Once you stop eating it you suddenly notice how prevalent cheese is.  Where as you once thought phrases like "cheesehead" or "the cheese state" are just cute metaphorical terms of endearment we use to talk about the area, you know now that the place literally is made of dairy and you can't escape seeing it.

I've gotten pretty good at ignoring all the amazing cheese this town has to offer and hardly mind that everyone around me makes yummy noises while nibbling on their latest gourmet cheese discovery at parties.  But everyone once in a while as I happily eat my bunless burger and salad a little rodent somewhere in my head will start screaming "Cheese!"  I try to ignore it but it gets more specific, "Ooey gooey sinful cheese drenched macaroni and cheese hot and fresh out of the oven!"  Then things go down hill into something along the lines of "Nachos! Nachos! Nachos! Nachos! Nachos!"  Until the part of my brain that hasn't been taken over by gerbils riffles my brain to find a solution that will make the cheese obsessed brain animals happy and not make me sick.  Anyone who read my vegan mac and cheese post knows that it is no small order to fill.

Thankfully I have a very understanding fella who is no longer surprised that the woman he lives with occasionally (okay on a very regular basis, shut up) goes crazy and insists that directly after lunch we must go to Whole Foods so I can look into making nachos immediately.  It probably helps that he usually benefits from my moments of madness by being rewarded with delicious food for the low low price of doing my endless dishes.

So the only way I could see this nacho thing going down was to indulge in goat cheese which I allow myself every couple of weeks because it doesn't seem to negatively effect me too much and lets face it I need some sort of cheese or I really will snap in the face of all this temptation.  However the goat cheese dribbled chips burst into flame because nachos under the broiler probably wasn't my greatest idea ever.  The cheese sauce I salvaged off of the wreckage on the other hand was amazing!  So whereas I cannot suggest asking me to ever making you something as simple as nacho I can tell you that this accidental goat cheese creation is a great dip.

Now world please do tell me how in the hell does one make nachos?

Spicy Goat Cheese Dip

1 5-ounce log goat cheese
1/4 cup heavy cream or coconut milk
1-2 chipotle peppers, chopped
1-2 teaspoons adobe sauce from chipotle peppers
1 jalapeno, finely chopped


Place goat cheese in a oven safe bowl.  Heat for 20 seconds or so until it becomes soft and easily mixable.  Add heavy cream or coconut milk until the cheese is the constancy you like, you might not need all the liquid depending on the goat cheese you're using.  Stir in the chipotle, adobe sauce and jalapeno until well combined.  Place in oven at about 375 degrees until cheese begins to brown on top.  Serve warm with good quality corn chips.

Tuesday, April 6, 2010

Cumin Crusted Lamb and Cashew Cauliflower

I have this habit of refusing to remember that the concept of marination is involved in cooking.  I read recipes ahead of time, comprehend the words "marinate over night" then selectively erase that phrase from my memory.  Then when the night comes that I want to make that recipe it's as if evil elves have come in and rearranged the world since the last time I looked at the recipe and malevolently invented the word "marinate" just to torture me.  Well at least that's how it feels when I'm looking forward to something for dinner and see that horrible world and realize that not only do I have to make new plans for dinner I also have to prep a part of tomorrow's dinner.  And darn it at that point I just want to eat.

I mean I'll follow some pretty crazy cooking instructions with no problem but marinating things just irks me every time, I never learn.  Twice last week this happened to me as if I was trying to subliminally teach myself a lesson by planning to eat two recipes with one of my least favorite words in it.  This recipe for cumin crusted lamb was totally worth eating dinner late while waiting for the meat to get all sticky and soft in the egg white and saki.  The meal was amazing and the chemistry of the marinade really did something wonderful to the texture of the lamb so that I would be more than happy to eat this again.  The slightly spicy cashew cauliflower only made the meal better.

However the spicy chicken thighs I had planned for tricked me two nights in a row.  So I added "marinating" to the list of things I'm leaving to the fella from now on since I'm apparently unable to grasp the concept.  He was more than happy to prep the chicken and really loved the end result.  I don't know if it was because I was still holding a grudge against that recipe for making me have to re-plan dinner or if the recipe wasn't just for me but I wasn't a fan.

So there you have it of all of the things I can do I'm stymied by the idea of putting meat in tasty liquid over night to make it even more tasty.  How sad is that?  I maintain that all recipes that have a marination step should start out with "warning marination ahead" in big bold letter before the ingredient list just to prevent these sort of cooking failures from happening.  Who is with  me?


Cumin Crusted Lamb

1 egg white
1 tablespoon rice wine or saki
2 teaspoons rice flour
1 teaspoon salt, more to taste
1/2 teaspoon black pepper
1 pound boneless leg of lamb or lamb shoulder, cut into strips about 1/2 inch by 2 inches

3 tablespoons vegetable oil
2 tablespoons cumin seeds, lightly cracked in a mortar or grinder
2 tablespoons whole dried red chili peppers
4 scallions, white and green parts only, cut on diagonal into 1-inch lengths
Sesame oil, for seasoning.

In a deep medium sized bowl combine egg white, wine, rice flour, salt and pepper. Add lamb and set aside to MARINATE 1 HOUR. 

Heat a large skillet (non stick works best) over high heat until a drop of water sizzle on contact. Swirl half the oil into pan and carefully add lamb, spreading it in a single layer. Let sear a moment, then stir-fry briskly just until lamb is no longer pink on the outside. Transfer to a plate. 

Swirl remaining oil into empty pan, add cumin seeds and chilies and stir-fry a few seconds until cumin seeds start to pop. 

Add scallions and stir-fry 1 minute. Then return lamb to pan and stir-fry 1 to 2 minutes more until lamb is cooked through. Turn off heat, sprinkle with salt and drops of sesame oil, and serve immediately.


Cashew Cauliflower

2 tablespoons oil
1 shallot, diced
1 medium head cauliflower, cut in florets
1 star anise
2 dried red chilies
salt and pepper, to taste
1/2 cup of water
1/2 cup cashews

Place oil in large frying pan over medium low heat.  Cook shallot in oil until softened but not browned, about 5 minutes.  Add cauliflower and raise heat to medium high to brown the cauliflower.  When the cauliflower has some color to it and is just starting to get tender, add the star anise, chilies, and salt and pepper.  Stir fry ingredients for another minute.  

Add water to the pan, turn heat back to medium low and cover.  Cook for about 10 minutes or until cauliflower is tender.

Remove cover from cauliflower and add cashews to pan until they're toasted, raising heat if necessary.  Remove star anise and chilies to serve.

Monday, April 5, 2010

Sunchoke Fries and Zataar Chicken

Sunchokes also know as Jerusalem artichokes are an interesting little root vegetable.  In their raw form they look like the evil cousin of ginger root, there is no chance they will win a prettiest food contest that's for sure.  And they taste like an artichoke heart had a love child with a particularly waxy potato.  In other words oddly delicious.  It's a fun way to get your artichoke fix without the bother of steaming and dissecting an artichoke.  They also have a GI of about 50 so they aren't a great option for the diet but they're a better option than the evil carby potato and are a great treat for when you're on the weight maintenance phase and miss making homemade steak fries.

Until the other night I've only ever had them in delicious root vegetable mashes in fancy restaurants which I love but have never tried to recreate.  When it came time to prepare the sunchokes however I was not in the mood to experiment, I just wanted something fairly quick and tasty to eat.  So I turned on the oven, cut up the sunchokes, seasoned them and hoped for the best thinking they would probably do well baked like any other vegetable to make a sort of french fry.  And they came out great.  I also threw together my favorite no effort chicken and had a great meal that was easy but also very extraordinary. 

So if you ever see sunchokes in the store or more likely at the farmers market give them a try.  Especially if you're a lover of artichokes, these are the next best thing.

Zataar Chicken

2 pounds skinless boneless chicken thighs
1 tablespoon oil
salt and pepper, to taste
2 tablespoons zataar seasoning 

Preheat oven to 375 degrees.  In a square glass baking dish coat the chicken with the oil then toss the spices on the chicken until somewhat evenly coated.  Bake in oven about 30 minutes or until the chicken is done all the way through.

Zataar is a blend of thyme, sumac and sesame seeds.  It's fairly easy to find and worth looking for because it's very flavorful and a nice seasoning for Mediterranean dishes.


Sunchoke Fries

handful of sunchokes, well scrubbed and cut into thin slices
2-3 tablespoons olive oil
salt and pepper, to taste
1 or 2 tablespoons rosemary

Heat oven to 375 degrees.  Spread sunchokes out on cookie sheet large enough to accommodate them all in a single layer.  Drizzle the sunchokes with enough oil to keep them from sticking to the pan, tossing them in the oil to coat.  Sprinkle salt, pepper and rosemary on the sunchokes to your taste.  Toss them again so the spices are evenly distributed and the sunchokes are spread out enough to not overlap much.  Bake for about 20 minutes or until the vegetables are tender in the middle and crispy on the edges.